Pressure Wash Vinyl Siding
Disclosure: This post may contain affiliate links, meaning if you decide to make a purchase via my links, I may earn a commission at no additional cost to you. See my disclosure for more info.
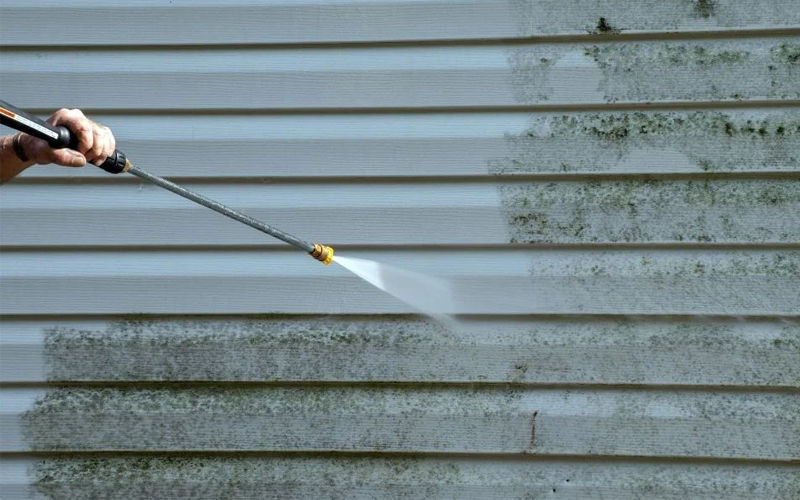
When it comes to revitalizing the exterior of your home, few methods are as efficient and effective as pressure washing vinyl siding. This procedure, akin to a rejuvenating spa treatment for your home, can breathe new life into weathered and dirty siding, restoring its original luster and charm.
Another benefit is that the cost involved is a lot cheaper than repainting your exterior. You don't even have to hire professional cleaners, you can do it by yourself!
But before you get excited and rent the next pressure washer you can find, there are points you need to remember when you pressure wash vinyl siding.
Table of contents
In this comprehensive guide, we'll walk you through the pressure washing process step by step, ensuring professional results without the hassle.
Pressure Washer
When it comes to cleaning vinyl siding, selecting the right pressure washer is paramount to achieving professional results without causing damage to your home's exterior.
With so many options available, it's essential to understand the specific features and considerations that make a pressure washer suitable for this task.
Types of Pressure Washers
There are two primary types of pressure washers, electric and gas-powered.
-
Electric pressure washers are typically lighter, more compact, and easier to maneuver, making them an excellent choice for homeowners with smaller properties or limited storage space. They are also quieter and emit zero emissions, making them environmentally friendly.
-
Gas-powered pressure washers, on the other hand, offer more power and versatility, making them ideal for larger properties or tougher cleaning tasks. However, they are heavier, louder, and require regular maintenance.
Pressure Output
When choosing a pressure washer for vinyl siding, it's crucial to consider the pressure output, measured in pounds per square inch (PSI), and the water flow rate, measured in gallons per minute (GPM).
For vinyl siding, a pressure washer with a PSI rating between 1300 and 1600 is recommended to effectively remove dirt and grime without damaging the siding.
You also want to choose a pressure washer that has a flow rate of 1.4 to 1.6 GPM, this should be sufficient to ensure adequate water flow for cleaning.
Nozzle Selection
The nozzle is another critical factor to consider when selecting a pressure washer for vinyl siding. Opt for a nozzle with a wide spray pattern, such as a 25 or 40-degree nozzle, to distribute the water evenly and prevent damage to the siding.
You want to avoid using narrow nozzles or those with a high-pressure setting, as they can cause streaking, damage the siding, or force water behind the panels, leading to mold or mildew growth.
Additional Features
You may also be able to find a pressure washers with additional features designed specifically for cleaning vinyl siding, such as
- adjustable pressure settings
- detergent tanks
- onboard storage for accessories.
These features enhance the usability and effectiveness of the pressure washer, making the cleaning process more efficient and convenient.
Assessment and Preparation
Before firing up the pressure washer, take a moment to assess the condition of your vinyl siding. Look for areas of dirt, grime, mold, or mildew buildup, paying particular attention to shaded regions and areas that are prone to accumulation.
Inspect for cracks on the siding and seal them properly before hosing your walls.
This initial assessment will help you tailor your cleaning approach to address specific problem areas effectively.
Next, gather all the necessary tools and supplies for the pressure washing process.
As discussed you'll need a pressure washer with an appropriate nozzle for vinyl siding, a mild detergent solution, a soft-bristled brush for stubborn stains, and protective gear such as safety goggles and gloves.
If you are unsure what cleaning agent to use on your siding you may like to check out our page on cleaning agents you can use to pressure wash vinyl siding.
Ensuring that these items are readily accessible so as to streamline the cleaning process and prevent unnecessary interruptions.
Preparing the Work Area
Once you've gathered your supplies, it's time to prepare the work area for pressure washing.
Remember that the pressurized water is powerful enough to knock off lamps and other ornaments on your walls, so if you can remove them.
Remove all outlets and other electrical objects that might short when wet, and never forget to cover your windows and doors especially if they contain glass.
Clear away any obstacles or debris that may obstruct your path, such as outdoor furniture or potted plants. Trim back any overhanging branches or foliage to ensure unobstructed access to the siding.
Protect nearby landscaping and delicate plants by covering them with a tarp or plastic sheeting. This will shield them from any cleaning solutions or runoff that may inadvertently damage them during the pressure washing process.
By taking these precautions now you will help minimize potential hazards and ensure you have a smooth and efficient cleaning experience.
Pressure Wash Vinyl Siding Procedure
With the work area prepared and the necessary supplies at hand, it's time to begin pressure washing the vinyl siding, well almost.
Before you start in ernest pressure wash vinyl your siding it is a good idea to test spray a small area to get used to its power. You can increase or decrease the power of the spray by adjusting either the nozzle setting or the distance at which you are holding the nozzle from the vinyl siding.
Remember to work in a steady manner, pressure wash vinyl siding one section at a time from bottom to top, sweeping from left to right as you work.
It is very important that the nozzle is pointed downward at a 45-degree angle to minimize the amount of water that can get behind the siding.
Apart from potentially blowing your vinyl siding off you wall,excessive water can bulge siding, dampen insulation or framework, and cause mold or electrical damage over time.
If you encounter stubborn stains or areas of heavy buildup, use a soft-bristled brush and a mild detergent solution to spot clean the affected areas. Avoid using excessive force or harsh chemicals, as these can damage the surface of the siding and compromise its integrity.
To avoid streaks after you pressure wash your vinyl siding, be sure to hose down starting from the bottom up. You don't want the cleaning agent to dry up on the wall because this will cause the streaks.
Don't go "hose crazy" on your wall, allow some time on one area to really give the cleaning agent a chance to remove stubborn stains.
If you follow these simple steps as you pressure wash your vinyl siding the result will be a home that looks as good as the day your siding was installed.
Final Thoughts
Pressure washing your vinyl siding doesn't have to be a hard task, as we have seen with a little preparation you can easily achieve a nice clean house yourself.
By choosing a pressure washer with the appropriate specifications and features tailored to the task at hand, homeowners can achieve professional-level cleaning while safeguarding the integrity of their vinyl siding.
So, before embarking on your next cleaning project, take the time to research and invest in the right pressure washer for the job. Your vinyl siding, and your home, will thank you for it in the long run.